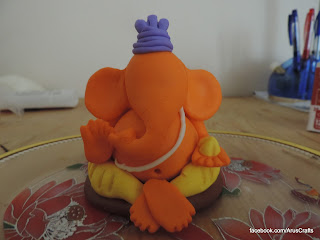
Lets welcome our favorite god Ganesha to our homes on the auspicious occasion of Ganesh Chaturthi,,,
Everyone will be busy making Ganesha's favorite food items for the festival. Here, I am showing you the process of making Environmental Friendly Ganesha at home and keep you even more busy :)
In a previous post, I have shown the process of making Clay at home.
Let's start the process,,,,,
Today I'm making the Ganesha only with clay.
These are the colors i used to make Ganesha.
Before making the process i want to share some tips:
- There is no need to use Fevicol for attaching pieces. Clay itself has Fevicol, so it sticks automatically.
- Always make the clay into a ball before making any shapes. This way you will get proper shapes.
- Always keep the remaining clay inside the air tight bag, so that it will not get dry.
- Every time you remove the clay from the air tight bag, knead it once.
First we will take a tray and apply some lotion to it. So that you can move it easily.
Ganesha Base:
Take some brown clay.
Make a half inch thick flat shape like this and place it on the tray.
Ganesha Stomach:
Take some orange clay.
Make a ball like this. There should be no cracks.
Place it on the center of the base carefully. After placing it, make sure you have some space in all sides.
Ganesha Legs:
Take some yellow clay.
Make a ball, roll it like a cylindrical shape. And continue to roll it until you get a shape like this. It should be thin at the center, thick at the sides and thin at the edges.
Arrange these legs on the base around the stomach.
Ganesha Feet:
Take two small balls of orange clay. Press it like rectangular shape. At one end by using a bamboo stick make 5 fingers.
Arrange these feet to the legs like one on top of the other.
Ganesha Dhoti:
It is very easy.
With the use of bamboo stick make some lines on the legs. It gives the feel of Dhoti.
Ganesha Hands:
Right Hand:
This hand is for blessing.
Take some orange clay. Roll it like cylindrical shape. We will divide the hand as wrist and elbow by rolling thick at one place and thin at one place.
The first end we will attach to the stomach and the last end is going to be the palm.
Press the last end and bend it. Take the bamboo stick and make the fingers.
Attach the hand to the top of stomach.
Left Hand:
This hand is to hold the modak.
Take ball of orange clay, roll it like a cylindrical shape. We will divide the hand as wrist and elbow by rolling thick at one place and thin at one place.
The first end we will attach to the stomach and the last end is going to be the palm.
Press the last end and make fingers by using bamboo stick.
Attach the hand to the top of stomach.
Modak:
This is ganesha's and everyone favorite.
Take small ball of yellow clay and make it like cone shape.
Real modak will have some lines on it. So, here with bamboo stick we will make some lines.
Ganesha Head and Trunk:
Take a ball of orange clay and roll it like this at one end.
The round part will be the Head and the other part will be Trunk.
Attach the head on the stomach by covering the joining part of both hands. I want my ganesha's trunk to the right hand side. You can change it as per your interest.
Ganesha Sacred Thread:
Take some white clay and roll it very thin. It should be even throughout.
Place this on Ganesha across from Left hand shoulder to the right hand.
Ganesha Ears:
Take 2 balls of orange clay, press them like round shape.
Make flat at one side to fix them to the head.
Attach the ears on the two sides of the head at the same place. Slightly bend at the edges.
Ganesha Navel:
By using bamboo stick make a small round at the center of the belly.
Ganesha Crown:
I want to make it like a Turban.
Take small ball of purple clay and roll it very thin and evenly.
Arrange it layer by layer until you get your desired size of the crown.
Ganesha Naamalu:

Take 3 very small balls of white clay and roll them evenly and place them on the head.

Take small ball red clay, press it and place it on the center of 3 lines.
Ganesha eyes:
Take 4 very small balls of black clay. Two for the eyes and two for the eye balls.
For the eyes roll the two balls thick at the center and thin in the middle. Bend them in the middle slightly.
Place them on the two sides of the face crossly.
Ganesha Teeth:
Take two very small ball white clay and roll them like cone shape.
Attach them to the sides of the trunk.
Mouse:
Take dark grey clay. Press it on one end like this to make the face.
Take dark grey clay. Roll it thick and even for the tail.

Join the tail to the back side of mouse. Place two very small balls of black clay as eyes at the front on both sides.
Ganesha Naivedyam:
Take white clay, make it flat circle and bend from the sides. Make some more modaks and place them on the plate.
Ganesha Aasan:
Take golden brown clay and make it like thick, even, rectangular shape.
Make sure you have enough space to place ganesha, mouse and naivedyam.
Place ganesha at the center, mouse at the left, naivedyam at the right.
With bamboo stick make some lines to the sides.
!!!!!!!Ganapathi bappa morya!!!!!!!


